Showing posts with label Regular movements. Show all posts

Thursday, 30 January 2020

Thar be movements ahoy!.

I thought it may be high time to return to my 2mm 'punk n' shot' campaign:


 Having failed to oust a Tuttinghammeshire advanced force from the town of Brickage the forces of Crivenshire have regrouped and decided to take the attack to the enemy....but a surprise awaits!...


...but first...


Rites of Spring, the sound of the revolution summer!.


  So, as i was waffling, i decided to dive into turn two of my Pike and steampunk bobbins, first the positions at the end of the last turn:


  The situation as the turn begins, Tuttinghammeshire forces are established over the Crivenshire border (circled). I decided to change things around a bit and make all moves at the same time to prevent the attack/ reaction cycle of last turn. To that end both Tuttinghamme and Crivenshire make their moves together:


To which end both forces pushed on in the east, actually moving past each other!. Crivenshire decided to contain the invading forces where they were and go on the attack at the border to try to catch them off guard. For their part Tuttinghammeshire also pushed on over the eastern border only further east, attacking the town of Whiffy in order to split the Crivenshire defensive forces. Why they chose to do this can be explained by what happened next:

Berkshire rises and declares support for Tuttinghammeshire!!

  Thats right the third shire to come to arms are Berkshire, adding to the forces of the north!, things look bleak for Crivenshire!. Berkshire waste no time in joining in the attack on Whiffy, meaning the next battle will be a two on one affair!.

 While i was up and at it i decided to draw some F.F.S cards for the upcoming battle, getting the following:
Crivenshire scouting seems to be going well for once, they get choice of deployment area, while a lucky trooper in the Tutinghammeshire force has found a spell scroll ready to use in the battle. For their part Berkshire scouts are very familiar with the battlefield, meaning they get to rejig it a bit before setting up!.
 The battle should be done soon, but you know me and my glacial pace when it comes to hobby stuff. I have decided this year i am going to go with the flow a little more, playing games and painting stuff as the mood takes, so this campaign will probably ebb and flow throughout the year. It will be nice to have something bubbling away that i can dip into when i want. It also means i can flit between projects without getting frustrated when i move away from things to something else, nothing is ever unfinished, just set aside ready to come back to later. Which is handy because i got a copy of this in the post yesterday:


Which has got me thinking about some 6mm Sci-fi stuff i could do......

......'till next time....

Sunday, 29 December 2019

The daring liberation of Deric Whattingley-Smithe, part 2

 It feels ages since i posted the first part of this battle(you can find it  here  ), what with Christmas, Christmas and...oh yeah, Christmas happening things have rather gotten away from me. But do not fear an' that, here i am again to tell you all the stuff that went and happened........But first.....


Pearl Jam live at some dutch festival back in the day, i choose this because living right up to her name the Amazing Mrs Sprinks only went and got me two tickets to see this lot next year for Christmas!.

Right, on with the fisticuffs!.

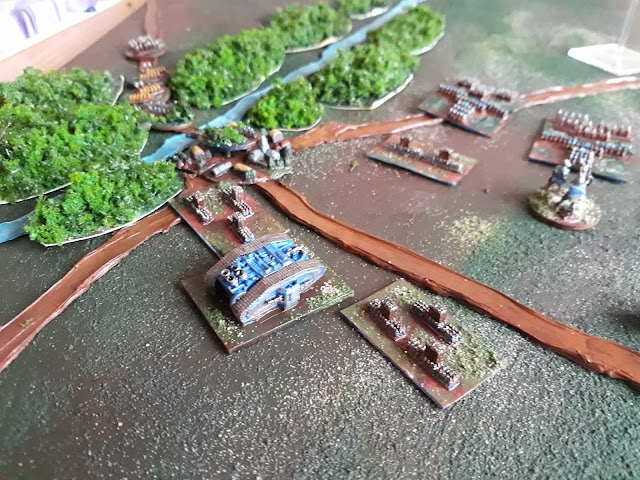
  To continue on with the report the forces of Crivenshire deployed onto the field, awaiting the Tuttinghammeshire advance:

On the left irregular horse, Regulars and some war Giants were ready to advance on Brickage.

A Heifer supported by Irregular foot watched over the Whattingley-Smithe farmsted.

The right was held by a mobile force of tanks supported by Light horse and Lancers ready to take the crossroads and support the troops at the pass.

Speaking of which the pass was under the watchful eye of the Crivenshire guns with some Irregular foot in support.

Two squads of Storm Badgers special action troopers were ranging ahead to protect Brickage.

At the break of dawns first light the forces of the northern invaders appeared ready to do their worst!.

 A fast attack force of rabid Brute Hounds and not quite so rabid light horse made directly for Brickage, supported by the S.S. Saucy Jack!.

 The rest of the force used the woods by the Kelpington Cross as a pivot, Whippets  loaded with Irregular foot troops belted towards the enemy center and the farmsted supported by the giant carnivorous goats of the Red riders and some deadly Lancers.
On the Cross itself Irregular horse and some light tanks prepare to attach the guns on the hill (gulp!).

All along the Crivenshire battle line the advance is called, the Southern army races to meet the foe!:


 The Heifer moves up to guard the farm.
While on the left the irregular horse ride on while the Regulars and Giants head for the town.

 The Crivenshire guns roar....
Destroying the Tuttinghamme Irregular Horse before they can close the range!.
 Battle is joined in the center as Tuttinghamme Irregulars disembark from their transports under fire!.

 Brutal hand to hand combat is joined on both sides of the river as the fight for Brickage kicks off!.


 A bitter fire fight in the center sees troops from both sides inflict heavy losses.
 Over the river the Storm Badgers deal with the Brute Hounds!.
Crivenshire reserves are dropped at the Town gates to allow the giants and Regulars to push on.

 The Lummoxshire Red riders bring shame to their kin, falling to mere southern irregular horse!!.
The situation at the midway point, Crivenshire hold the town, farm and pass, Tuttinghammeshire just hold the cross!.

Things turn further towards a Crivenshire victory as the Light horse hunt down the Stoats to take the Crossroads.
Menouvering in the center sees the northern forces begin to be encircled.

In a last ditched attempt to grab some objectives the S.S. Saucy Jack comes about and heads for the Pass, depositing its irregular passengers in a daring attack on the enemy guns!.

The Guns roar in reply, taking out an enemy Whippet....

 ...however the attacking airborne division destroy all but one of the guns!.
 Over at Brickage the other pack of Brute hounds are taken care of!.

While the last of the Tutters armour is destroyed by the rampaging giants!.
The situation on the penultimate turn, Brickage is secured for Crivenshire, as is the farm. Light horse have the crossroads sewn up making three southern held objectives but only one detachment of guns now hold the pass. 

 The Giants continue to mop up in the center.
While a desperate final shooting phase sees the Tuttinghamme irregulars destroy the remaining Crivenshire cannon!.

While the S.S.Saucy Jack lumbers over to the crossroads under heavy fire from the Crivenshire center to blast the Southern light horse.........
...........leaving the air craft in control of the crossroads!.

Meanwhile the Storm Badgers restore calm to the town.
The Crivenshire Heifer remains where it began the battle, undamaged in control of the farm.

 But despite all that the last gasp attack on the pass has left it in Tuttinghammeshire hands!.

The final positions.

 So with two objectives each the game is a very bloody draw!. The area around Brickage remains in Tuttinhammeshire hands despite some very determined efforts by the local forces to wrestle control back for Crivenshire!.

Oh and for anyone wondering, Brickage is actually situated next to the site known as (The Amazing ones painting area of) Shitetippe:


....don't tell the locals!.


.....All that remains to do today is to welcome Mr Mark Flanagan to this mess of a blog, welcome Sir!. Please feel free to pop a quick hello in the comments, if you blog please pop a link in there too so we can all have a squiss........right, 'till next time.......

Monday, 2 December 2019

The battle of Phlemm Valley (again)

Right, this might be a long one so i will be cracking on. This post will contain an apology, some music and a (gosh darn honest to goodness) battle report!....in that order!.

  First i need to apologize to not only you fine people but to my inner gamer himself (he's a twat but....). Why?, well this is the first time i have got minis on the table for a game since sodding JANUARY!!!!. Yep, you read that right, i have done zero, none, nada, fu*k bloody co*king all gaming for almost a blimmin year!!. I am now sorting myself out!!. More games will follow (im sure.....ish...). For this i am sorry.

  Right next:


  I reckon that'll about do it!.

And now........


THE BATTLE OF PHLEMM VALLEY

  The following is taken from the book 'What do you need two wannabe kings for?' by the esteemed hispurian Dr Phillip Ostenhousensen and is produced without permission, mostly because hes dead (kidding):

    ......'And so Tuttinghammeshire marched to the border, the Earls declaration of war spurring on several Lords to rally their troops to strike the enemy under the command of Sir Physs. In reply the King in the interim, one Glinric Pallenbrooke also raised his armies and ordered mobile scouting groups to patrol the border fearing a probe from the enemy would be imminent....he was right. On the morn of the 2nd day of the war a mobile Force under the control of Sir Plantah advanced to secure the sheltered valley of Phlemm, a little trodden area between the two shires, it was from here Tuttinghammeshire planned to move in force but first they had to secure and fortify the Valley to serve as a staging post for the action to come. It would have been plain sailing had not one sir Finnagree the clenched and his mobile patrol spotted their movements and although outnumbered moved to head them off. Sir The Clenched sent messages to all surrounding forces to raise some support, the call being answered by one sky captain Sir Crowsfell. Crowsfell moved with all haste to the aid of the mobile force...but would he arrive soon enough?.'


    Yep that just about sums up the situation.

First some important information about the valley itself:

Phlemm Valley, worth fighting for??!.

   The valley is situated to the south of the Crippled Jaw Mountins on the border between the two warring shires. It runs parallel to and about fifteen miles from the far more popular Clemm valley, a popular trade route complete with services and camping areas. As such Phlemm Valley is little used except by those not wanting to be known to be travelling. It was for this reason it was chosen by Sir Plantah for his probe. The valley does have some points of interest that proved to be important as the battle went on. They are marked on the picture above:

a: Douchee pass (on the left hand side). A key route linking the valley with Clemm, the road between the two being a key path for smugglers and other ner'do wells. It was here that Sir Crowsfell and his relief force made his entrance.

b: The abbey of the brothers of Sir Dagnabbitt. The abbey was built by one Abbot Kligger and is staffed by his three brothers (who also insist on being abbots rather than more common brothers...and are bigger than Kligger). It is said that it was built after Kligger was visited by a vision of Sir Dagnabbitt on the morn after an especially violent pickled egg and turnip wine session, the spirit of the long dead monk appearing through the fugg to order Kligger to build the abbey and bring his message to the people of the valley. Kligger enlisted his brothers and set to work, failing to realize the valley was actually unpopulated. To this day he secretly wonders if he caught the right name of the valley in which he was ordered to build.

c: The Shpitty river bridge, owned by Flowthru crossing co. The bridge is situated to be a link between the valley and the small trading towns to the south east of the mouth of the valley. As with all of the Flowthru co's Bridges it is staffed by a single old Spinster and a small army of vicious and highly trained toll recovery cats. The co always choose only the bitterest spinsters to staff its facilities, training them in the use of shame via the use of the acid tounge to disarm and discourage all that cross into paying their frankly astronomical tolls. It is said the withering stare and sharp barbs of a trained Flowthru employee can strip tack from a horse at 3oo yards!.

  These important points provided the objectives the Fossestershire force wished to control to assure they would be able to use the valley to launch further attacks.

The Forces;

Sir Plantahs probers of the Valley
You will need to click on the picture to read the blatherings within (sorry). It is worth noting that two Irregular companies were mounted in the Whippit and two in the Baluga.

Sir Finnagree the Clenched's border patrol:
Again click to make head or tail of it, the two Irregular foot are mounted within the Whippit.

Sir Crowesfell's relief force:

As before, the Irregulars begin the game within the Baluga.

 I am using a (still being) adapted version of G.W.'s old epic rules for this game. Both the Tuttinghamme force and Sir the clenched's troops began the game off table, moving on on the first turn under advance orders. Sir Crowsfell would turn up at the start of a random turn through Douchee Pass. Victory went to the side that controlled most objectives (pass, abbey and bridge) at the end of 5 turns.

TO RUDDY BATTLE:
The chuff of steam engines could be heard above the birdsong as the sun rose above the eastern ridge of the Valley, bringing both sides into battle. From the south the Crivenshire force advanced as one.

Crivenshire arrive into the Valley.

To the northern edge the grumpy Tutters roared!
 A partly mechanized force in the center.
 Air attack troops hugged the western hills.
While a fast attack force headed for the Pass.

 The forces close.

 The Tuttinghammeshire Whippit fired some pot shots at the distant enemy lines.
Taking out the Crivenshire Ferrets before they can get a shot away!. First blood to the north!!.

  Turn 2 begins with further advances from both forces, racing to claim the objectives.
 The Crivenshire Whippit sped up to the Pass, its passengers jumping out to secure the objective. The covering fire of the t.a.n.k and its supporting light horse wiping out the advancing Tutters!.
Not to be outdone near the Abbey a withering hail of fire from the Tuttinghammeshire Whippet and its disembarking irregulars cut down the opposing cavalry force barreling towards them!.

The bridge is soon secured by the Tuttinghammeshire airborne troops!.

The third turn begins with a cheer from the Crivenshire forces as the S.S Lady Enid E appears through the pass!
 Huzzah!!!!!.

And drops his troops in the center of the valley to oppose the forces at the bridge.
Turn 3.

 Air Crivenshire wastes no time in destroying the troops holding the bridge, but in the background the Saucy Jack comes about...

Around the field Crivenshire have some successes:


But for every enemy they kill...


Tuttinghamme reply in kind!.

As the battle draws to a conclusion a dog fight breaks out by the bridge

Both Beluga airships landing hits on each other spelling doom for both!.


And the KES prove their worth by finishing the Crivenshire resistance.


The situation as the battle ends.

  So a victory for Tuttinghammeshire!, 

  I cant believe its been so long since i played a game...what a tool!. Well thats the campaign well and truly kicked off!. What will Crivenshire do now the north have invaded, how  will the other shires react?, will i remember to draw some O.F.F.S cards next battle?! find out these things and more next time when we play more:


  Before i pop off i want to give a hearty Wronghammer Hello and welcome to the chaos to Wouter Wolput and Airbornegrove26.  Mr 'grove26 writes the brilliant Give 'em Lead blog, check it out its great. I cant see a blog listed for mr Wolput but then i'm rather behind on these things so if you blog sir please feel free to pop a link in the comments so we can check it out.....


....'till next time....